Prefer the command line? See the Hoard Agent Setup guide instead.
1. Sign up and pick a plan
Sign up at tryhoard.com and pick the plan that matches how often your prices need to move — Gold (weekly), Platinum (daily), or Diamond (every four hours). All three include Hoard Desktop and an API key. See tryhoard.com/pricing for the full ladder.2. Answer a few quick questions
Right after you sign up, Hoard asks a short set of questions about how you sell — which games, how you ship, how aggressively to price, and whether you want to watch before it changes anything. Your answers set sensible pricing defaults you can change any time later in Settings. It takes about a minute. Want to see each question before you start? Walk through the seller profile wizard.3. Download Hoard Desktop
Download from the setup page (auto-detects your OS).Hoard Desktop isn’t available for Linux yet. Linux users should follow the Hoard Agent Setup guide.
4. Open Hoard Desktop
Once the app opens, Hoard Desktop shows a short setup screen (this is the desktop app connecting to your account — separate from the pricing questions you answered in the browser). Then:- Click Log in with Hoard. Your browser opens to tryhoard.com.
- Click Authorize to connect your account. (If you’re not logged in, you’ll log in first.)
- Hoard Desktop downloads its sync engine automatically and starts.
5. First sync
A Chrome window opens to TCGplayer’s login page. Log in normally and complete the CAPTCHA if one appears. Hoard Desktop takes over from there. Your session is saved so you won’t need to do this again until it expires.
If Chrome isn’t installed, Hoard Desktop downloads a compatible Chromium automatically on first run (~200MB, one time).
Your computer needs to be on for syncs to happen. Hoard Desktop runs locally, so it syncs when your machine is awake. If your computer is off during a scheduled sync, nothing breaks, it just picks up next time. Most sellers leave their shop PC running during business hours and that’s plenty.
6. Select your product lines
Go to Settings → Sync and pick which games should appear on your dashboard. Hoard pins games it already sees in your inventory, and the search box lets you add less common TCGplayer product lines without showing a giant checklist by default.What you get with Hoard Desktop
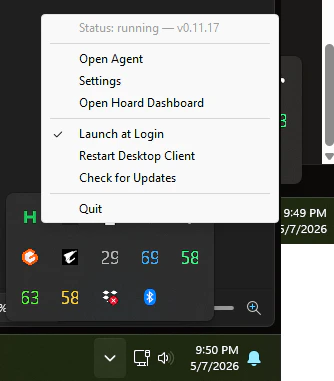
Beyond syncing your store, the desktop app gives you:- Tray icon — see at a glance whether Hoard is running, syncing, or needs attention
- Local dashboard — logs, settings, and a “Sync Now” button, right on your computer (opens in your browser)
- Launch at Login — starts automatically when you log in to your computer
- Automatic updates — Hoard Desktop updates itself when we push a fix
- Help tab — answers to common questions without leaving the app