Two kinds of sticker
There are two ways a sticker gets tied to a card, and they behave differently. The difference matters most when a card sells, so it’s worth getting straight up front.Your-inventory stickers (printed from your own cards)
This is the main path. You print a sheet from cards that are already in your inventory, and each code is bound to one specific card line forever. One code maps to one condition, one printing, one variant. If you stock the same card in Near Mint and Lightly Played, those are two stickers, because they’re two different prices. These stickers are the card’s identity. They are not claimable, not reassignable, and not reusable. You can’t peel one off a sold card and move it to a different card, because the code is permanently that card. When the card sells, the sticker has done its job and you retire the physical sticker with the card. There’s no reusing it. (If you want a reusable code, that’s the blank sticker below.)Blank stickers (claimable pool codes)
A blank sticker is a pre-printed code that starts tied to nothing. Today these come from Hoard, for example a sheet handed out at an event, so this isn’t something you print yourself yet. You scan a blank one, claim it to your account, and then assign it to a card. From that point it works just like a printed sticker, except that you own the code and can reuse it. Because you own a blank code rather than baking it into a card, you can put it back to work when the card sells: retire it (unstick it from the sold card) and assign it to the next card. The same physical sticker can ride one card after another over its life. You can also turn a blank code off entirely. So: printed-from-inventory stickers are one-card-forever; blank claimed codes are reusable. Everything below about claiming, assigning, retiring, reusing, and deactivating applies to blank claimed codes only. A printed your-inventory sticker is never reassigned.Printing a sheet of your cards
You print your-inventory stickers from two places:- Settings → Public binder tab → “QR price stickers” → Open print sheet. The account-level entry point. With no filter it prints your whole active inventory, ordered by set and name.
- The Cards tab Export panel. Filter the table to exactly the cards you want, and the sheet prints just those, in the order they’re shown.
Standard 1-inch labels (48 per sheet)
The default style is a browser print view laid out as a 6×8 grid of true 1-inch square stamps, 48 to a letter sheet. Each stamp is one QR plus a one-line identity (the set code and collector number) so you can tell two cards apart at a glance before you stick them. This style is built for off-the-shelf 1-inch square label sheets: Avery and Online-Labels 1-inch squares, or a Dymo 30332 if you run a label printer. Load the sheet, print, peel, stick.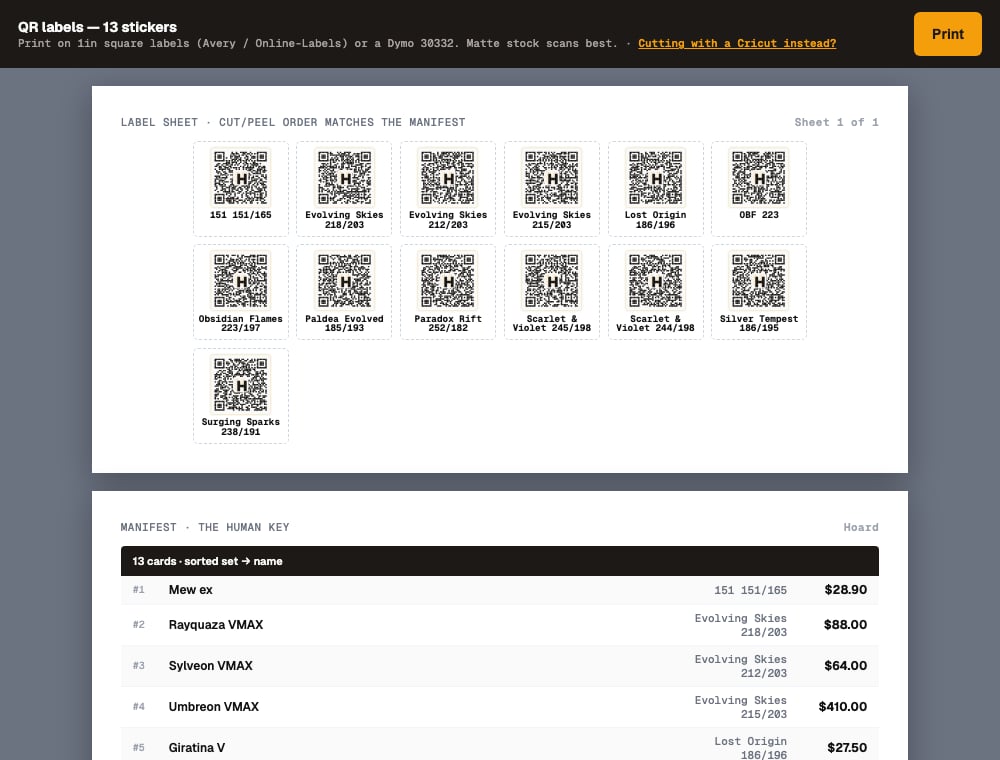
Cricut print-then-cut (8×8 per sheet)
If you cut your own stickers on a Cricut, switch to the Cricut style from the “Cutting with a Cricut instead?” link in the toolbar. It lays out an 8×8 grid of 64 codes matched to the exact geometry of a Cricut print-then-cut template, so the machine’s blade lands on the cell outlines. The payoff is the one-click Download PNG (300 DPI) button, which rasterizes the whole sheet to a single print-resolution image. You upload that one image to Design Space instead of splitting and placing 64 separate codes by hand. There’s a Download SVG option too if you’d rather work with the vector. The background is transparent so the template’s own printed cell outlines show through.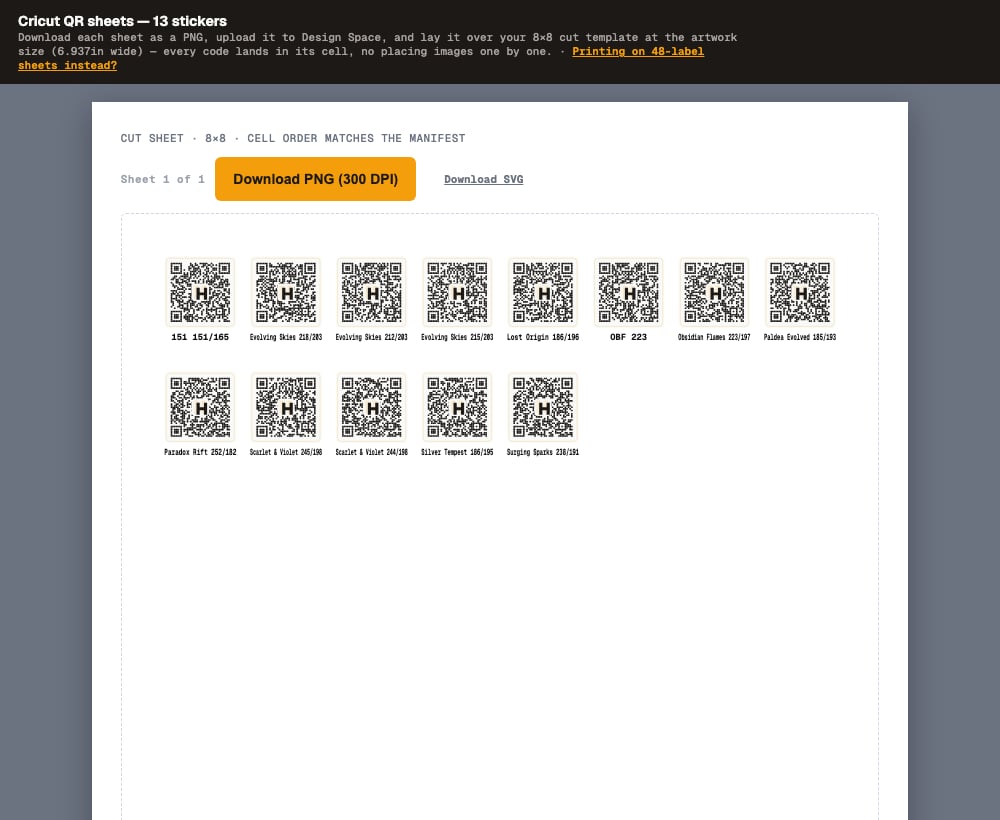
The scan page
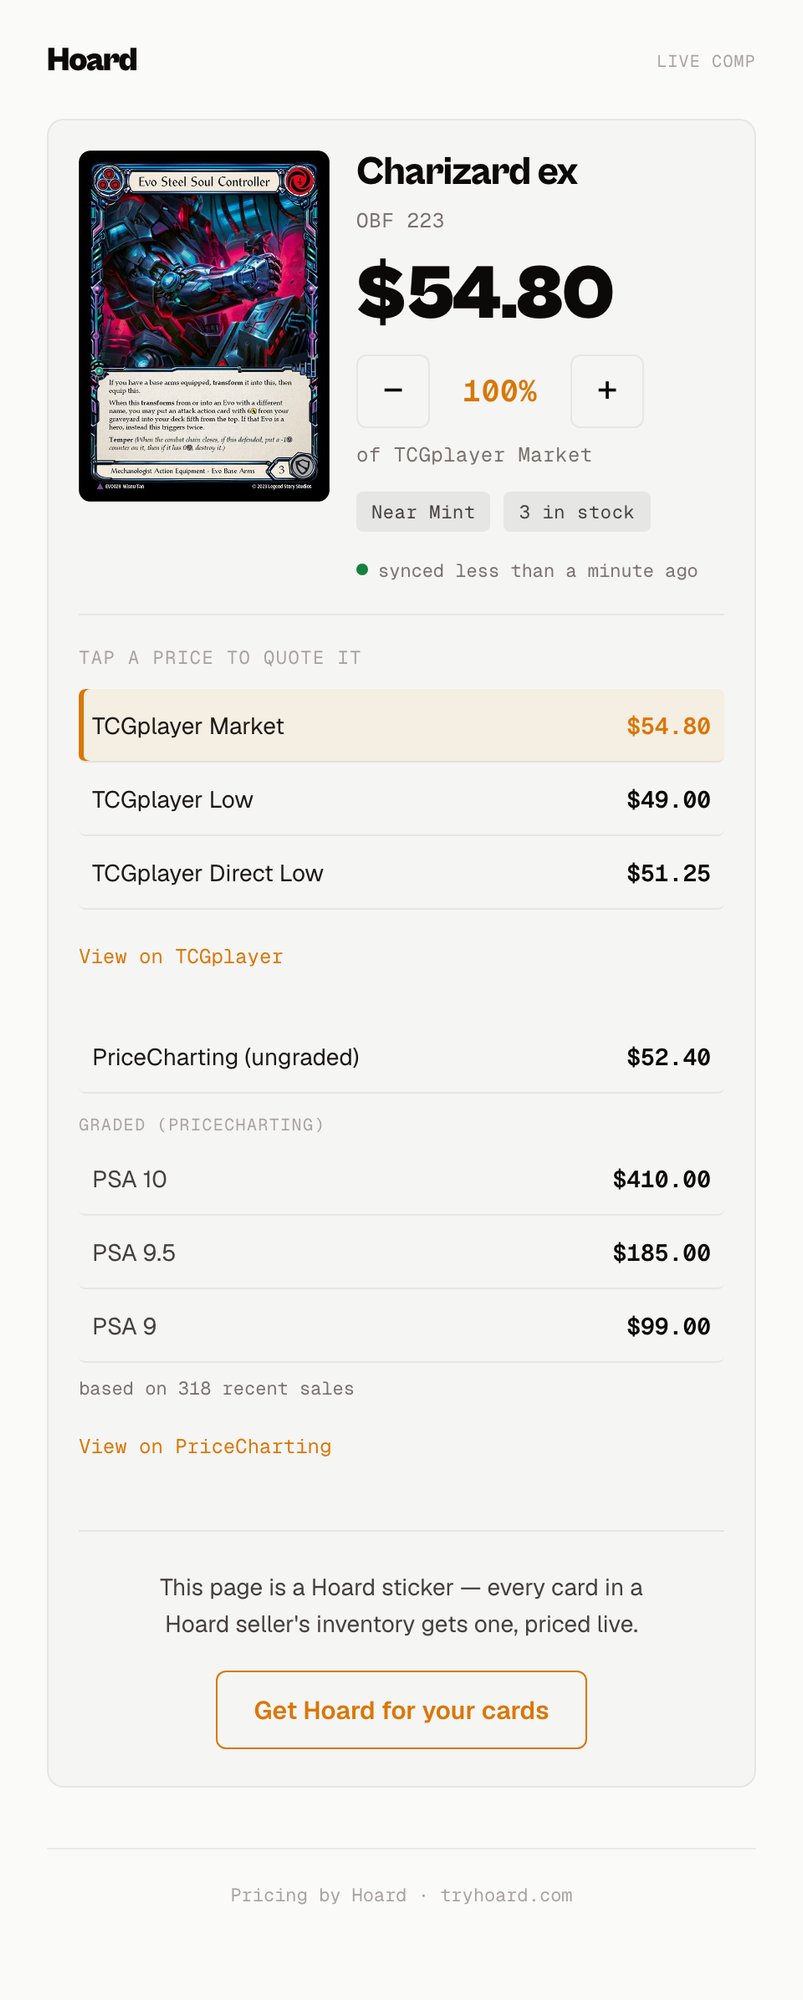
When anyone scans a sticker, they land on a mobile-first page built for one purpose: showing the card and quoting a price in person. Here’s what’s on it.The haggle dial
The dial is the hero of the page. It’s a big public market number with an adjustable percentage next to it, stepped with − and + from 25% up to 200% in steps of 5. It exists so you can quote “85% of market” out loud without doing math and without ever showing the buyer your own ask. Drop the dial to 85% and the number it shows is the price you say; the buyer never sees your bespoke listing price, only the figure you choose to quote. The dial picks a sensible starting number on its own: TCGplayer Market if there is one, then PriceCharting ungraded, then TCGplayer Low, then Direct Low, the first one that’s a real price. You change which comp it’s built on by tapping a comp, below.Tap a price to quote it
Every price on the page is a button. Tap TCGplayer Low and the dial re-bases on Low, relabels itself “of Low,” and recomputes at whatever percentage you’ve dialed in, so “I’ll do it for Low at 90%” is two taps. The active row highlights amber so you can see which comp you’re quoting off. TCGplayer rows, the PriceCharting ungraded row, and every graded row are all tappable.The comps
Under the dial, the page shows whichever market signals it has for that card:- TCGplayer Market, Low, and Direct Low, whichever are present.
- PriceCharting ungraded, the loose-card comp.
- A PSA/BGS grade matrix for graded Pokemon with PriceCharting evidence: BGS 10, PSA 10, PSA 9.5, PSA 9, PSA 8, PSA 7. Each grade sits on its own line, comped against its own grade, never blended into one number. A “based on N recent sales” line shows under the matrix when there’s sales data behind it.
Source links
Each provider gets one link out:- View on TCGplayer. This is the win over eyeballing a search. When Hoard has resolved the catalog product, the link lands on the exact product and variant, not a search results page you’d have to scan through. (If a product didn’t resolve, it falls back to a name-and-set search.)
- View on PriceCharting. A variant-aware lookup carrying the name, variant, number, and set so you land on the right loose-card page.
The freshness line
A “synced N ago” line tells you and the buyer how recently the underlying price was refreshed, so nobody’s quoting off a week-old number without knowing it.When you scan your own sticker
When you’re signed in and scan one of your own stickers, you get one extra line a buyer never sees: Your Hoard ask, your actual bespoke listing price for that card. It’s there so you know your own floor while you haggle off the dial, and it’s owner-only, gated on you being the signed-in account that owns the card. A buyer scanning the same sticker never sees it.Privacy
Stickers are private by default, and you control visibility at two levels.Account-wide default
Settings → Public binder has a Public stickers toggle. It’s off by default, meaning private. While stickers are private, a non-owner who scans hits a sign-in wall and learns nothing about the card or its price. Flip it on and anyone who scans a sticker sees the comp page. Either way, the scan page is never indexed by search engines, so nothing leaks into Google.
Per-card override
On a card’s detail panel there’s a small segmented control, Default / Public / Private, that overrides the account default for that one card:- Default follows your account toggle.
- Public opens that card even while the account is private, so you can put a live sticker on one chase card and leave everything else dark.
- Private locks that card even while the account is public, for the one thing you don’t want quoted off a scan.
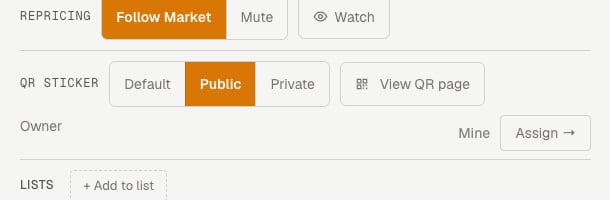
Preview what a scanner sees
On that same card detail panel there’s a View QR page link next to the visibility control. Click it and Hoard opens that card’s scan page exactly as a buyer would see it (minting the code on the spot if the card’s never been printed). Use it to sanity-check a card before you print a sheet, or to jump from a card in your dashboard straight to its sticker page.Blank stickers: claim, assign, and reuse
Blank stickers are the reusable side of the platform. The flow is claim, then assign, then later retire and reassign.Claim a blank code
Scan a blank sticker handed to you and, signed in, you get a claim button. Claiming ties that code to your account. Now it’s yours, and no one else can take it over.Assign it to a card
A claimed-but-unassigned code shows an Assign this sticker screen on your phone: the sticker’s QR and short token at the top, then a card picker. You can scope the picker with the Show dropdown (All cards, or any of your lists like Con Box or a grading submission) and search by name, then tap the card. Once assigned, the code behaves exactly like a printed sticker: scanning it shows the live comp, the dial, and the same privacy rules.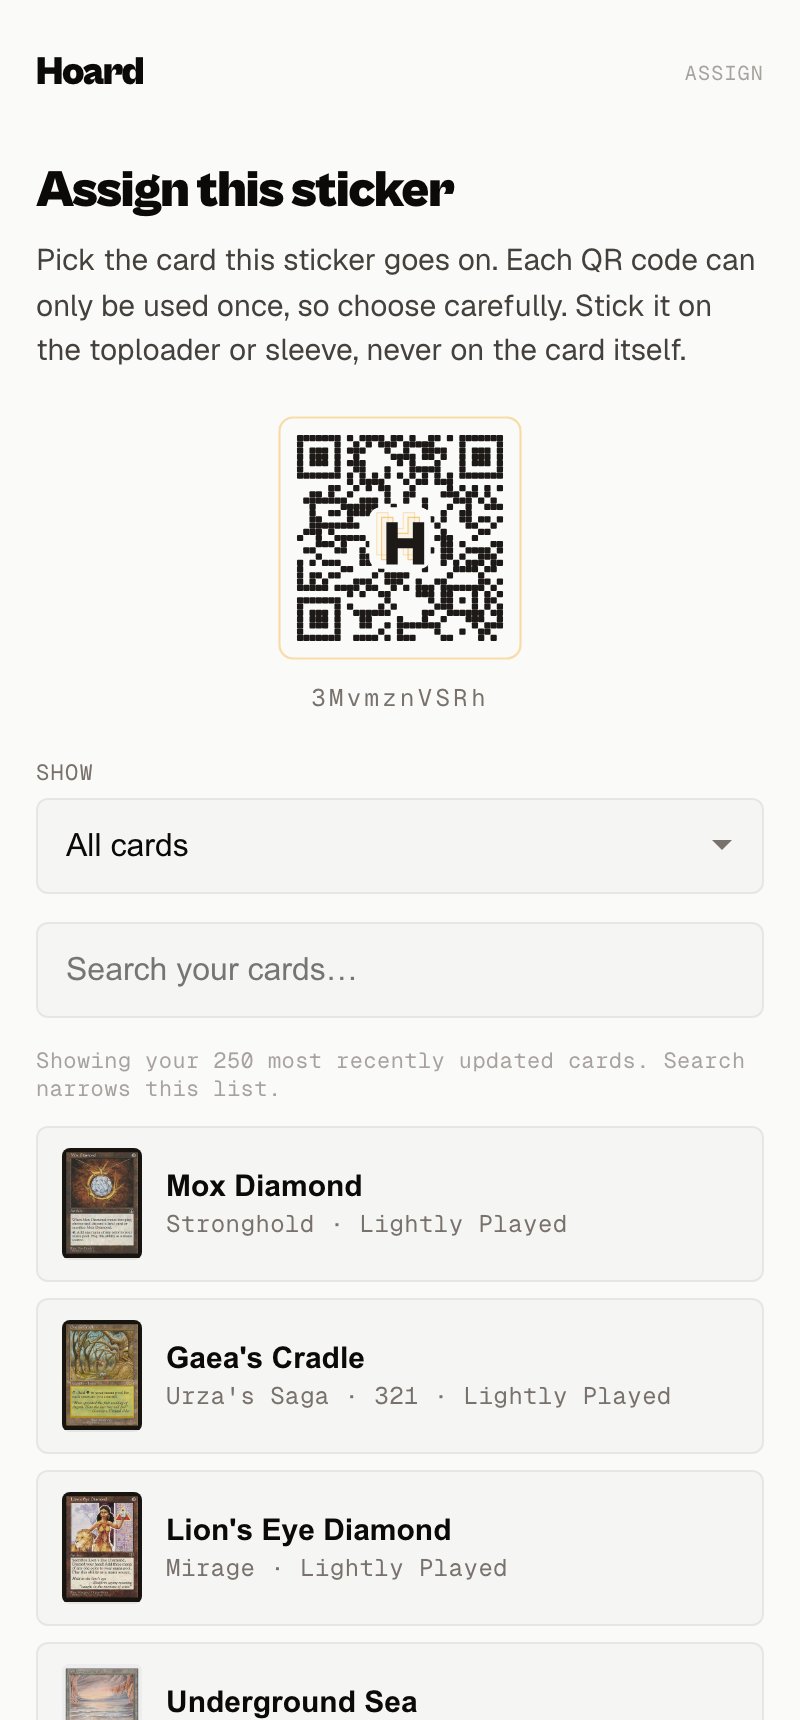
Reuse it when the card sells
When the assigned card sells, you don’t throw the code away. Open the sticker’s page (you’ll see an owner view at the bottom) and tap Card gone? Reuse this sticker. That unsticks the code from the sold card and drops it back into the assign flow, ready for the next card. The helper text says it plainly: “Unsticks it from this card so you can put it on the next one.” This is unstick-and-reassign, never a silent swap. It takes one explicit action from you, and during the gap between retiring the old card and assigning a new one, anyone who scans sees the private wall, never the old sold card. The hand-off is always deliberate.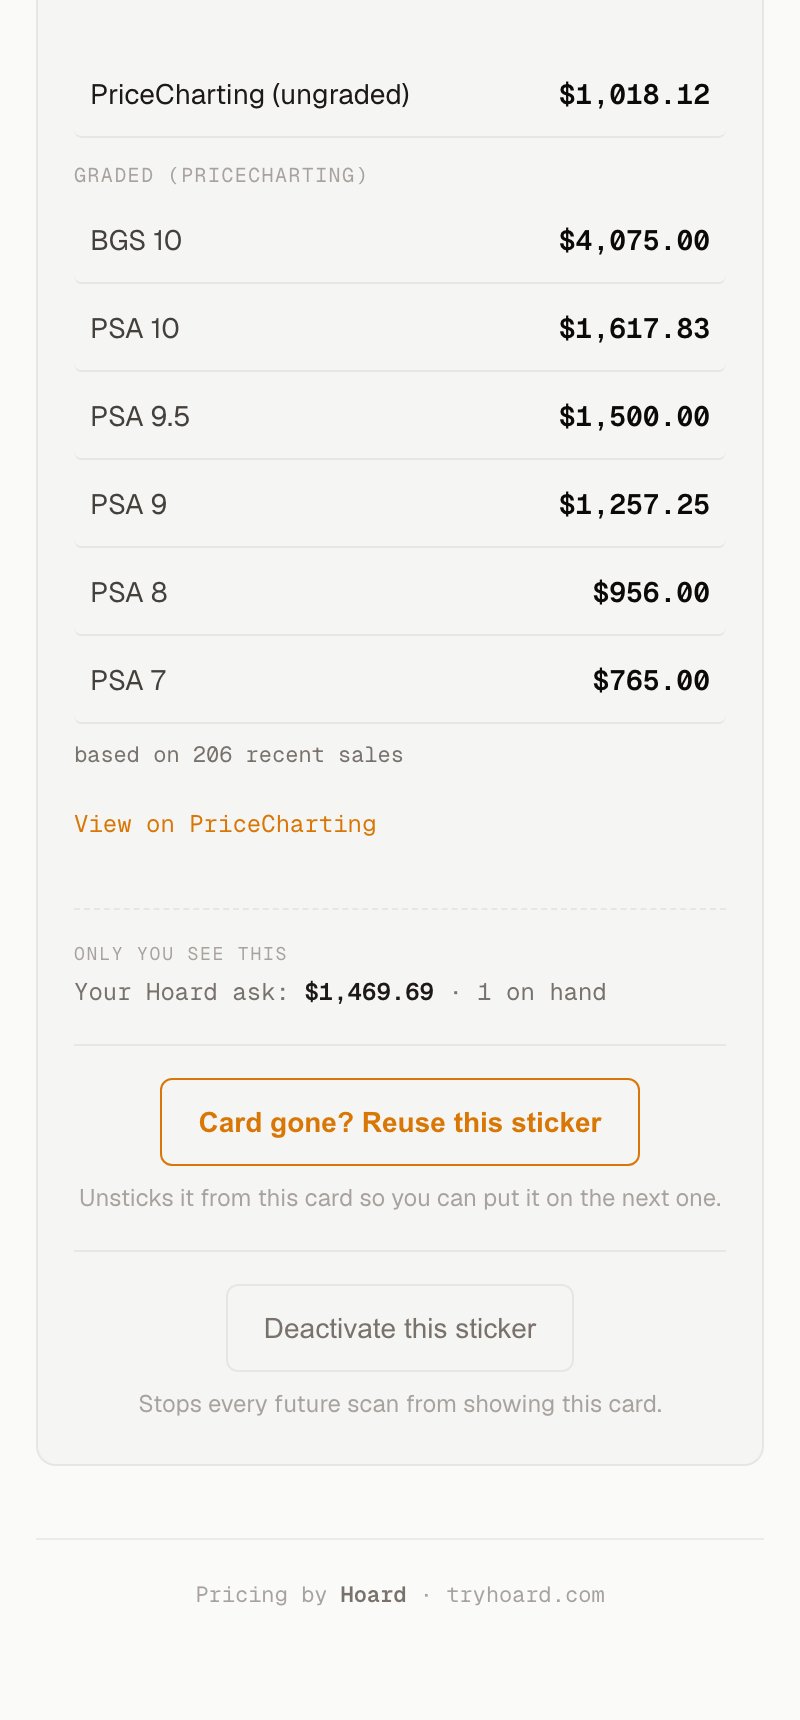
Turn a code off
If you’re done with a blank code for good, tap Deactivate this sticker (its helper text: “Stops every future scan from showing this card.”). Deactivating turns the code off so it no longer shows any card. Reuse is for putting a code back to work; deactivate is for retiring it from service. Both are available only on blank claimed codes, never on your printed your-inventory stickers.A dead scan never dead-ends
Whatever happens to a sticker, scanning it never lands on an error page. If a card has sold through, if a blank code has been turned off, or if the code isn’t one Hoard recognizes, the scan lands on a friendly Hoard page instead. For a turned-off code it says the sticker is inactive and points the scanner to Hoard, rather than showing a broken link.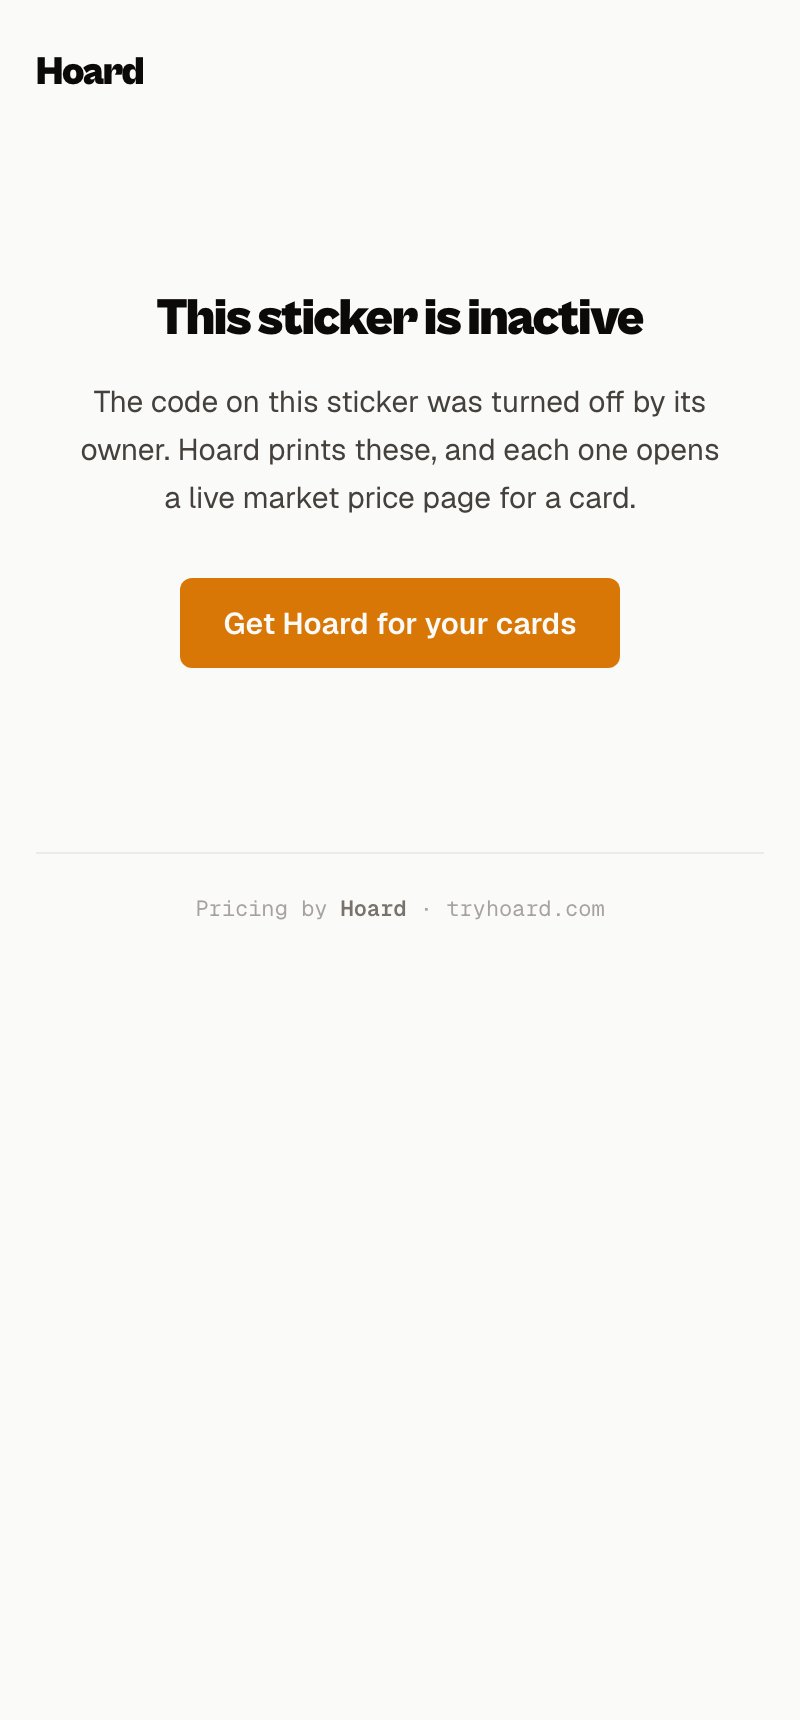
Not yet
A few things people ask about that aren’t built:- No self-serve blank sheets. You can’t buy or print your own batch of blank claimable codes yet. Blank stickers come from Hoard for now.
- No trading or transferring a claimed code. Once you claim a blank code it’s yours; there’s no handing it to another seller.
- No reward program for stickers that bring in signups. A sticker can lead a new seller to Hoard, but there’s no perk or credit for that today.
See also
- Share your binder — the online counterpart: a shareable page of your top cards for Discord, Instagram, or a QR on your case.
- Print and scan your first QR stickers — the step-by-step walkthrough.